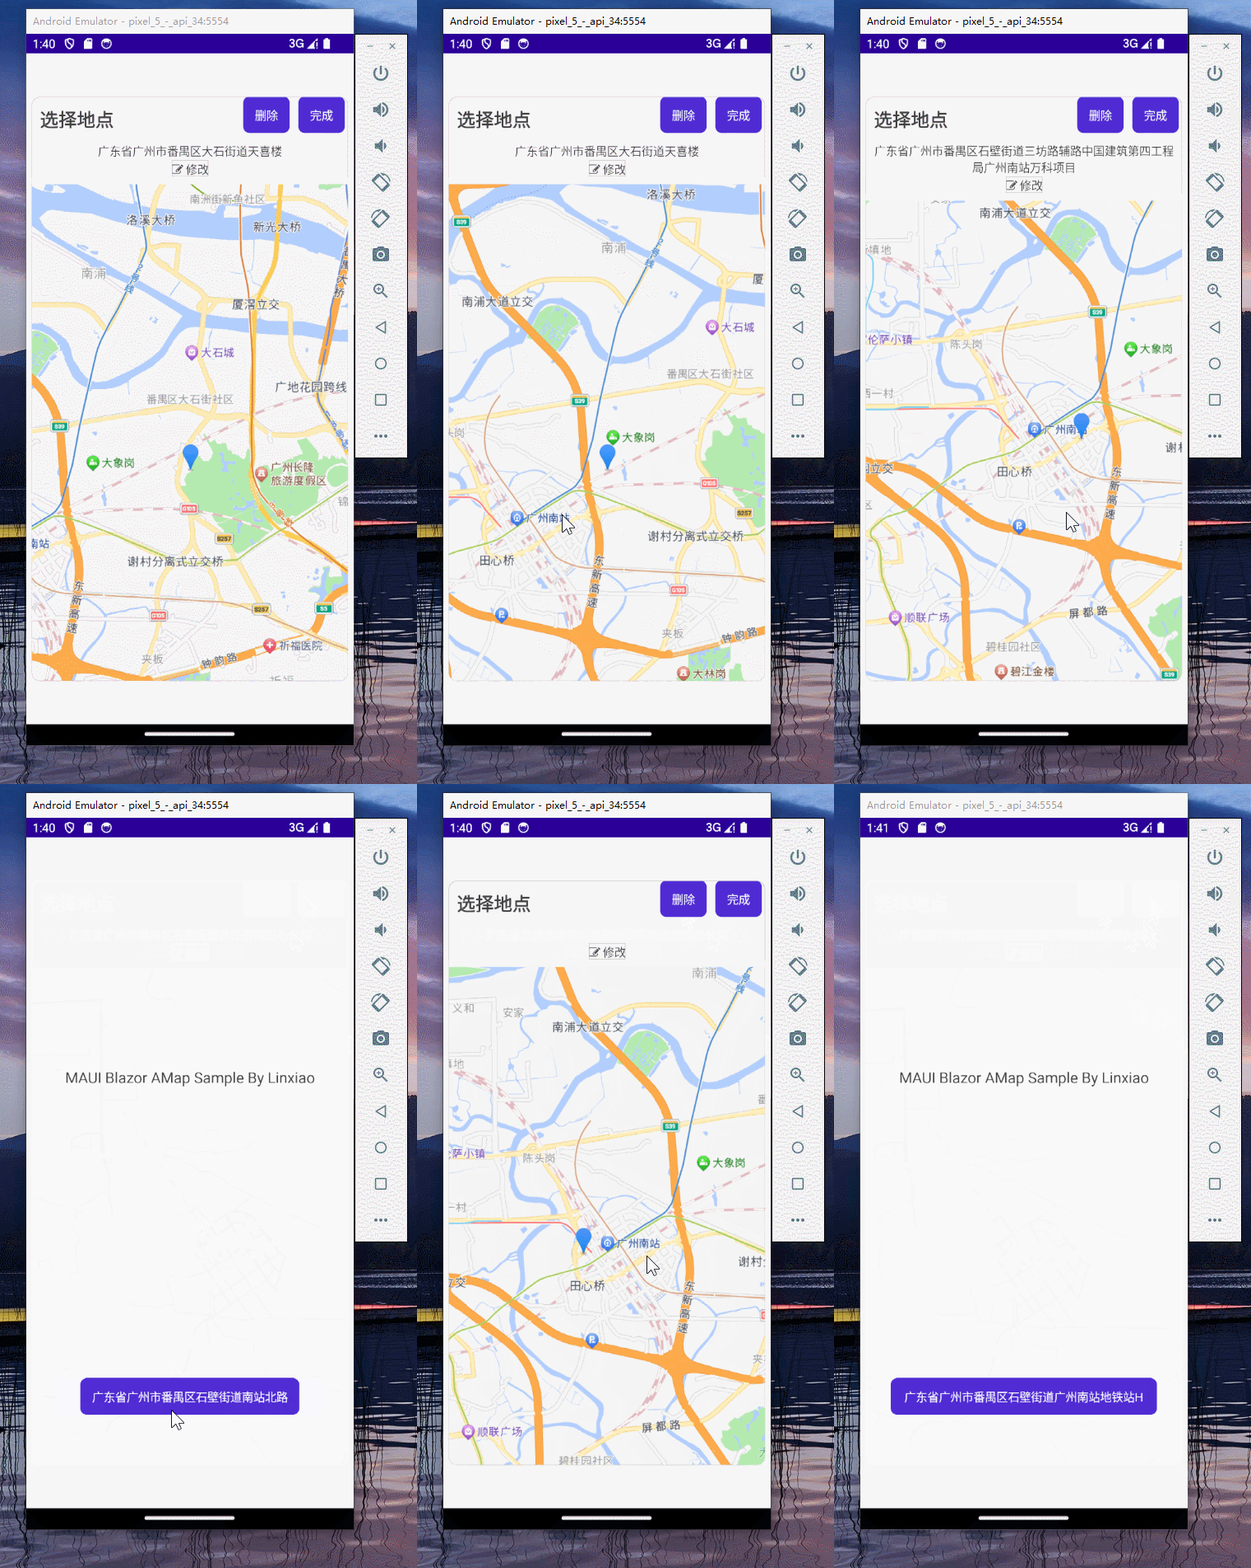
地图组件在手机App中常用地理相关业务,如查看线下门店,设置导航,或选取地址等。是一个较为常见的组件。
在.NET MAUI 中,有两种方案可以集成高德地图,一种是使用原生库绑定。网上也有人实现过:https://blog.csdn.net/sD7O95O/article/details/125827031
但这种方案需要大量平台原生开发的知识,而且需要对每一个平台进行适配。
在这里我介绍第二种方案:.NET MAUI Blazor + 高德地图JS API 2.0 库的实现。
JS API 2.0 是高德开放平台基于WebGL的地图组件,可以将高德地图模块集成到.NET MAUI Blazor中的BlazorWebView控件,由于BlazorWebView的跨平台特性,可以达到一次开发全平台通用,无需为每个平台做适配。
今天用此方法实现一个地图选择器,使用手机的GPS定位初始化当前位置,使用高德地图JS API库实现地点选择功能。混合开发方案涉及本机代码与JS runtime的交互,如果你对这一部分还不太了解,可以先阅读这篇文章:[MAUI]深入了解.NET MAUI Blazor与Vue的混合开发
使用.NET MAU 实现跨平台支持,本项目可运行于Android、iOS平台。
前期准备:注册高德开发者并创建 key 登录控制台 登录 高德开放平台控制台 ,如果没有开发者账号,请 注册开发者 。
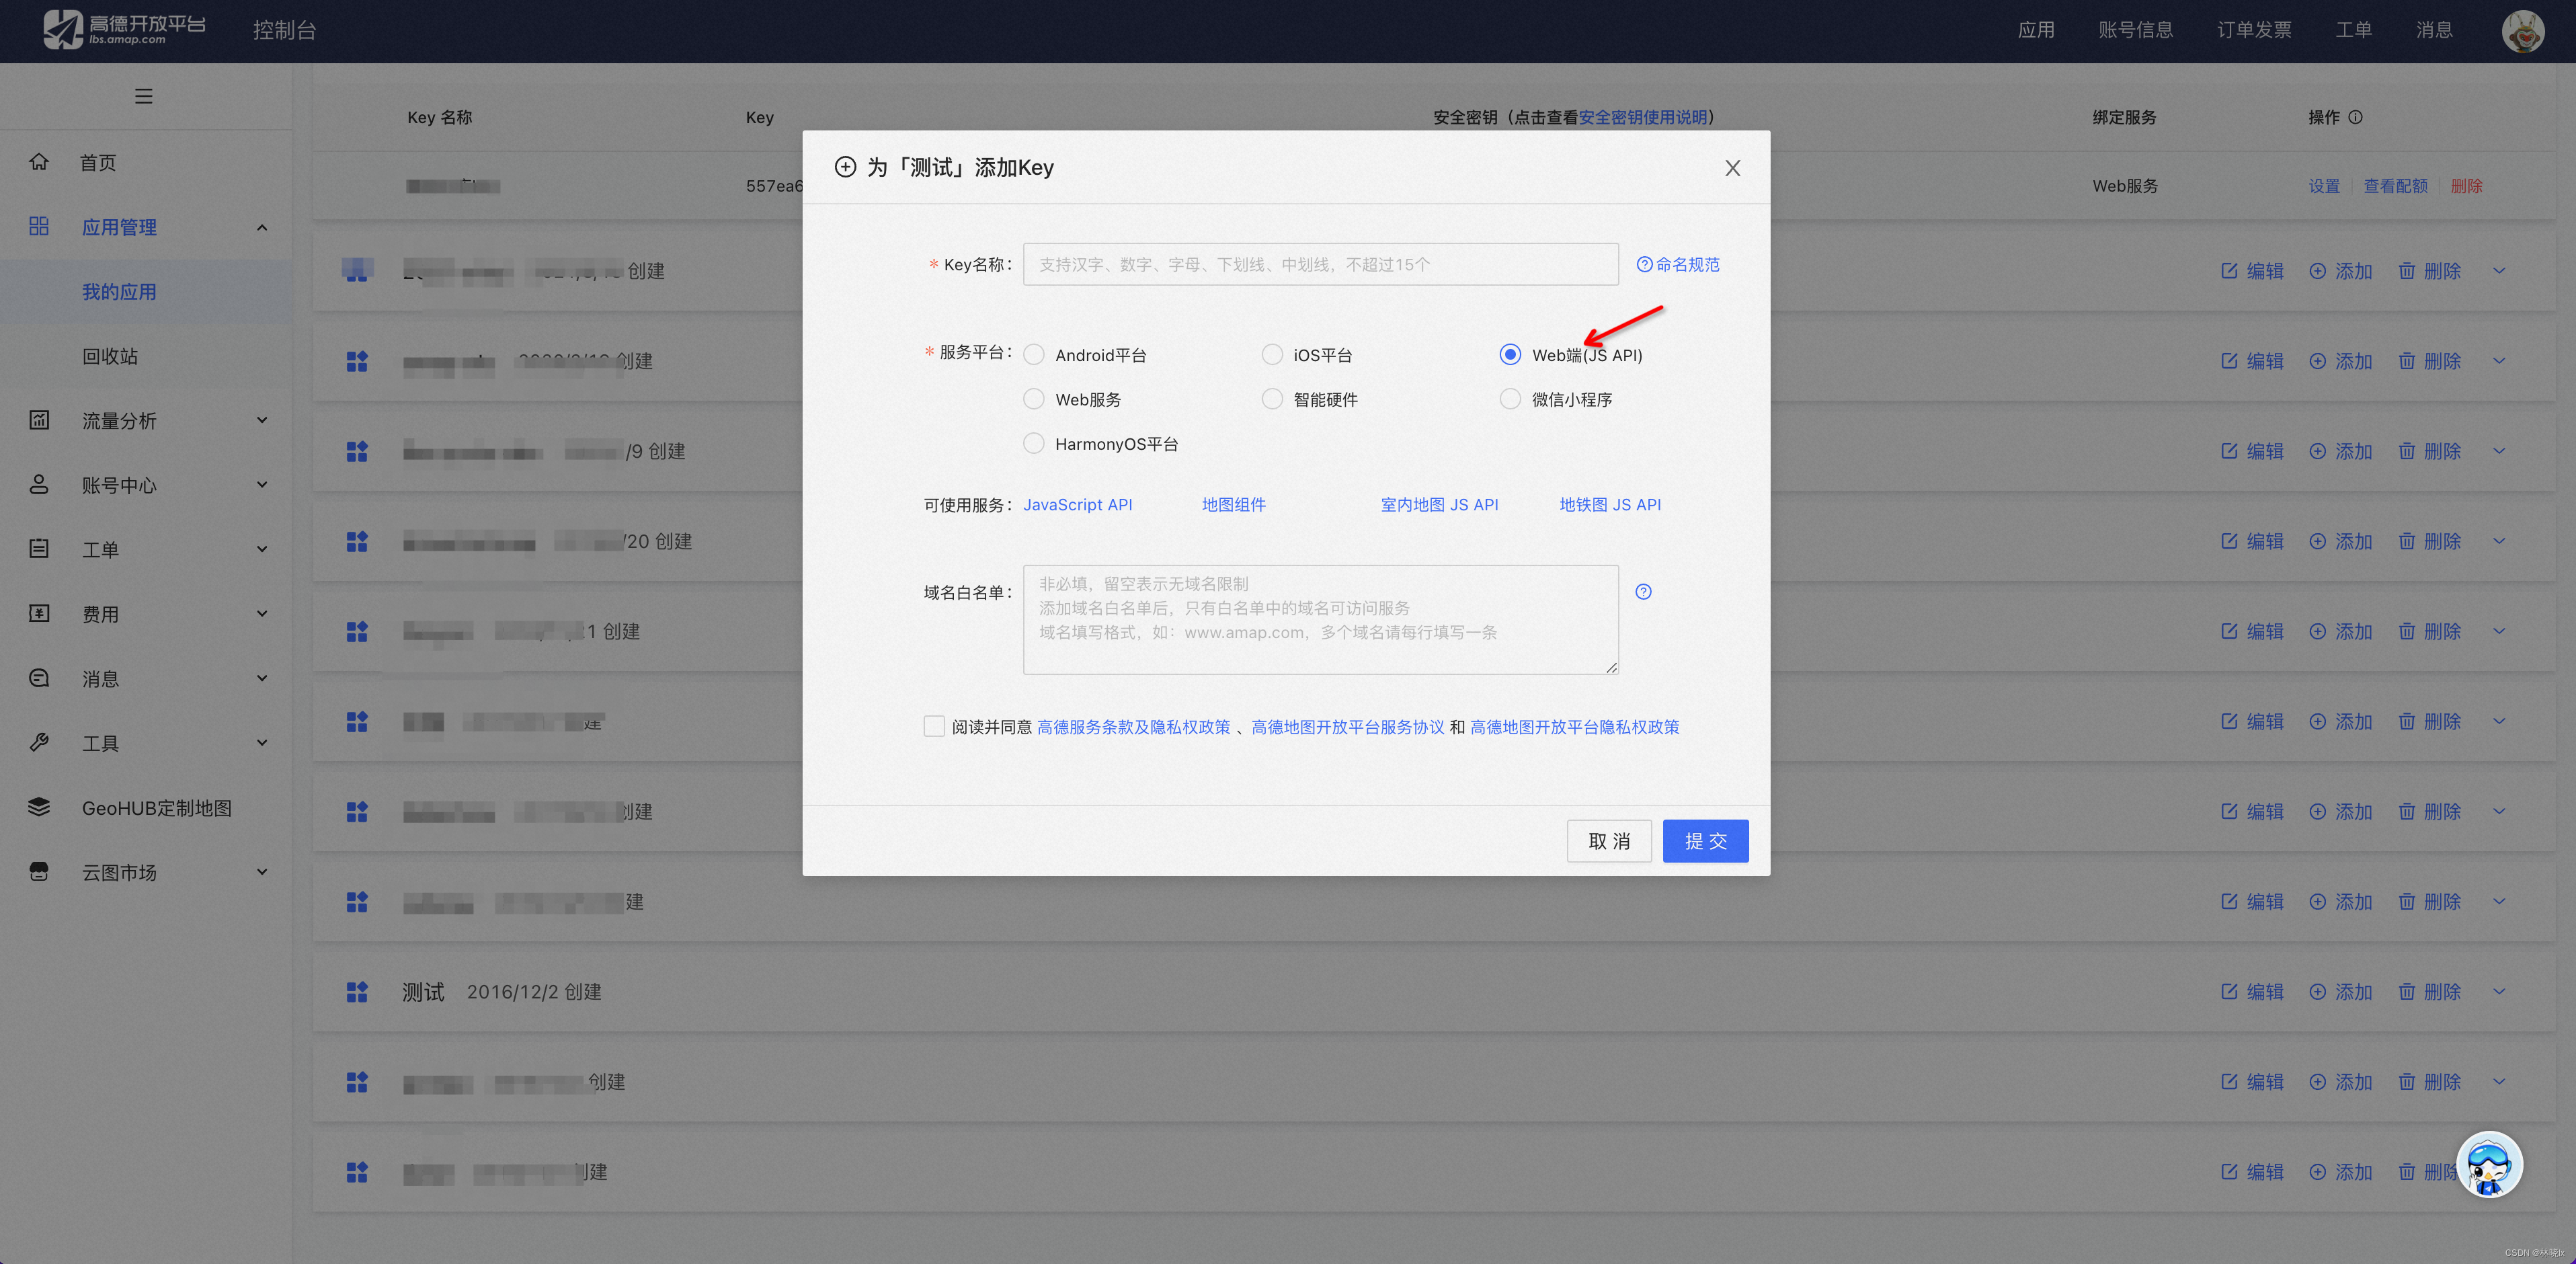
创建 key 进入应用管理,创建新应用,新应用中添加 key,服务平台选择 Web端(JS API)。再创建一个Web服务类型的Key,用于解析初始位置地址。
获取 key 和密钥 创建成功后,可获取 key 和安全密钥。
创建项目 新建.NET MAUI Blazor项目,命名AMap
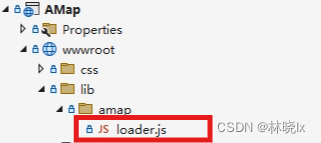
创建JS API Loader 前往https://webapi.amap.com/loader.js另存js文件至项目wwwroot文件夹
在wwwroot创建amap_index.html文件,将loader.js引用到页面中。创建_AMapSecurityConfig对象并设置安全密钥。
1
2
3
4
5
6
7
8
9
10
11
12
13
14
15
16
17
18
19
20
21
22
23
24
25
26
27
28
29
30
31
32
33
34
35
<!DOCTYPE html> <html lang="en"> <head> <meta charset="utf-8" /> <meta name="viewport" content="width=device-width, initial-scale=1.0, maximum-scale=1.0, user-scalable=no, viewport-fit=cover" /> <title>AmapApp</title> <base href="/" /> <link href="css/app2.css" rel="stylesheet" /> </head> <body> <div class="status-bar-safe-area"></div> <div id="app">Loading...</div> <div id="blazor-error-ui"> An unhandled error has occurred. <a href="" class="reload">Reload</a> <a class="dismiss"></a> </div> <script src="_framework/blazor.webview.js" autostart="false"></script> <script src="lib/amap/loader.js"></script> <script type="text/javascript"> window._AMapSecurityConfig = { securityJsCode: "764832459a38e824a0d555b62d8ec1f0", }; </script> </body> </html>
配置权限 打开Android端AndroidManifest.xml文件
添加权限:
1
2
3
4
<uses-permission android:name="android.permission.ACCESS_FINE_LOCATION" /> <uses-permission android:name="android.permission.ACCESS_COARSE_LOCATION" /> <uses-permission android:name="android.permission.ACCESS_BACKGROUND_LOCATION" />
打开Info.plist文件,添加权限描述信心
1
2
<key>NSLocationWhenInUseUsageDescription</key> <string>允许使用设备的GPS更新您的位置信息。</string>
创建定义 创建Position,Poi,Location等类型,用于描述位置信息。由于篇幅这里不展开介绍。
创建模型 创建一个MainPageViewModel类,用于处理页面逻辑。代码如下:
1
2
3
4
5
6
7
8
9
10
11
12
13
14
15
16
17
18
19
20
21
22
23
24
25
26
27
28
29
30
31
32
33
34
35
36
37
38
39
40
41
42
43
44
45
46
47
48
49
50
51
52
53
54
55
56
57
58
59
60
61
62
63
64
65
66
67
68
69
70
71
72
73
74
75
76
77
78
79
80
81
82
83
84
85
86
87
88
89
90
91
92
93
94
95
96
97
98
99
100
101
102
103
104
105
106
107
108
109
110
111
112
public class MainPageViewModel : ObservableObject { public event EventHandler<FinishedChooiseEvenArgs> OnFinishedChooise; private static AsyncLock asyncLock = new AsyncLock(); public static RateLimitedAction throttledAction = Debouncer.Debounce(null, TimeSpan.FromMilliseconds(1500), leading: false, trailing: true); public MainPageViewModel() { Search = new Command(SearchAction); Done = new Command(DoneAction); Remove = new Command(RemoveAction); } private void RemoveAction(object obj) { this.Address=null; this.CurrentLocation=null; OnFinishedChooise?.Invoke(this, new FinishedChooiseEvenArgs(Address, CurrentLocation)); } private void DoneAction(object obj) { OnFinishedChooise?.Invoke(this, new FinishedChooiseEvenArgs(Address, CurrentLocation)); } private void SearchAction(object obj) { Init(); } public async void Init() { var location = await GeoLocationHelper.GetNativePosition(); if (location==null) { return; } var amapLocation = new Location.Location() { Latitude=location.Latitude, Longitude=location.Longitude }; CurrentLocation=amapLocation; } private Location.Location _currentLocation; public Location.Location CurrentLocation { get { return _currentLocation; } set { if (_currentLocation != value) { if (value!=null &&_currentLocation!=null&&Location.Location.CalcDistance(value, _currentLocation)<100) { return; } _currentLocation = value; OnPropertyChanged(); } } } private string _address; public string Address { get { return _address; } set { _address = value; OnPropertyChanged(); } } private ObservableCollection<Poi> _pois; public ObservableCollection<Poi> Pois { get { return _pois; } set { _pois = value; OnPropertyChanged(); } } private Poi _selectedPoi; public Poi SelectedPoi { get { return _selectedPoi; } set { _selectedPoi = value; OnPropertyChanged(); } } public Command Search { get; set; } public Command Done { get; set; } public Command Remove { get; set; } }
注意这里的Init方法,用于初始化位置。
GeoLocationHelper.GetNativePosition()方法用于从你设备的GPS模块,获取当前位置。它调用的是Microsoft.Maui.Devices.Sensors提供的设备传感器访问功能地理位置 - .NET MAUI
创建地图组件 创建Blazor页面AMapPage.razor以及AMapPage.razor.js
在AMapPage.razor中引入
1
2
3
4
5
6
7
8
9
protected override async Task OnAfterRenderAsync(bool firstRender) { if (!firstRender) return; await JSRuntime.InvokeAsync<IJSObjectReference>( "import", "./AMapPage.razor.js"); await Refresh(); await JSRuntime.InvokeVoidAsync("window.initObjRef", this.objRef); }
razor页面的 @Code 代码段中,放置MainPageViewModel属性,以及一个DotNetObjectReference对象,用于在JS中调用C#方法。
1
2
3
4
5
6
7
8
9
10
11
12
13
14
15
16
@code { [Parameter] public MainPageViewModel MainPageViewModel { get; set; } private DotNetObjectReference<AMapPage> objRef; protected override void OnInitialized() { objRef = DotNetObjectReference.Create(this); } private async Task Refresh() { ... }
在AMapPage.razor.js我们加载地图,并设置地图的中心点。和一些地图挂件。此外,我们还需要监听地图的中心点变化,更新中心点。 这些代码可以从官方示例中复制。(https://lbs.amap.com/demo/javascript-api-v2/example/map/map-moving)。
1
2
3
4
5
6
7
8
9
10
11
12
13
14
15
16
17
18
19
20
21
22
23
24
25
26
27
28
29
30
31
32
33
34
35
36
37
38
39
40
41
42
43
44
45
46
47
48
49
50
51
52
53
54
55
56
57
58
59
60
61
62
63
64
65
66
67
68
69
70
71
72
73
74
75
76
77
78
79
80
81
82
83
84
85
86
87
88
89
90
91
92
93
94
95
96
97
98
console.info("start load") window.viewService = { map: null, zoom: 13, amaplocation: [116.397428, 39.90923], SetAmapContainerSize: function (width, height) { console.info("setting container size") var div = document.getElementById("container"); div.style.height = height + "px"; }, SetLocation: function (longitude, latitude) { console.info("setting loc", longitude, latitude) window.viewService.amaplocation = [longitude, latitude]; if (window.viewService.map) { window.viewService.map.setZoomAndCenter(window.viewService.zoom, window.viewService.amaplocation); console.info("set loc", window.viewService.zoom, window.viewService.map) } }, isHotspot: true } AMapLoader.load({ //首次调用 load key: '0896cedc056413f83ca0aee5b029c65d',//首次load key为必填 version: '2.0', plugins: ['AMap.Scale', 'AMap.ToolBar', 'AMap.InfoWindow', 'AMap.PlaceSearch'] }).then((AMap) => { console.info("loading..") var opt = { resizeEnable: true, center: window.viewService.amaplocation, zoom: window.viewService.zoom, isHotspot: true } var map = new AMap.Map('container', opt); console.info(AMap, map, opt) map.addControl(new AMap.Scale()) map.addControl(new AMap.ToolBar()) window.viewService.marker = new AMap.Marker({ position: map.getCenter() }) map.add(window.viewService.marker); var placeSearch = new AMap.PlaceSearch(); //构造地点查询类 var infoWindow = new AMap.InfoWindow({}); map.on('hotspotover', function (result) { placeSearch.getDetails(result.id, function (status, result) { if (status === 'complete' && result.info === 'OK') { onPlaceSearch(result); } }); }); map.on('moveend', onMapMoveend); // map.on('zoomend', onMapMoveend); //回调函数 window.viewService.map = map; function onMapMoveend() { var zoom = window.viewService.map.getZoom(); //获取当前地图级别 var center = window.viewService.map.getCenter(); //获取当前地图中心位置 if (window.viewService.marker) { window.viewService.marker.setPosition(center); } window.objRef.invokeMethodAsync('OnMapMoveend', center); } function onPlaceSearch(data) { //infoWindow.open(map, result.lnglat); var poiArr = data.poiList.pois; if (poiArr[0]) { var location = poiArr[0].location; infoWindow.setContent(createContent(poiArr[0])); infoWindow.open(window.viewService.map, location); } } function createContent(poi) { //信息窗体内容 var s = []; s.push('<div class="info-title">' + poi.name + '</div><div class="info-content">' + "地址:" + poi.address); s.push("电话:" + poi.tel); s.push("类型:" + poi.type); s.push('<div>'); return s.join("<br>"); } console.info("loaded") }).catch((e) => { console.error(e); }); window.initObjRef = function (objRef) { window.objRef = objRef; }
地图中心点改变时,我们需要使用window.objRef.invokeMethodAsync('OnMapMoveend', center);从JS runtime中通知到C#代码。
同时,在AMapPage.razor中配置一个方法,用于接收从JS runtime发来的回调通知。CurrentLocation属性。
1
2
3
4
5
6
7
8
9
10
11
12
13
14
[JSInvokable] public async Task OnMapMoveend(dynamic location) { await Task.Run(() => { var locationArray = JsonConvert.DeserializeObject<double[]>(location.ToString()); MainPageViewModel.CurrentLocation=new Location.Location() { Longitude=locationArray[0], Latitude =locationArray[1] }; }); }
同时监听CurrentLocation属性的值,一旦发生变化,则调用JS runtime中的viewService.SetLocation方法,更新地图中心点。
1
2
3
4
5
6
7
8
9
10
11
12
13
14
15
16
17
18
protected override async Task OnInitializedAsync() { MainPageViewModel.PropertyChanged += async (o, e) => { if (e.PropertyName==nameof(MainPageViewModel.CurrentLocation)) { if (MainPageViewModel.CurrentLocation!=null) { var longitude = MainPageViewModel.CurrentLocation.Longitude; var latitude = MainPageViewModel.CurrentLocation.Latitude; await JSRuntime.InvokeVoidAsync("viewService.SetLocation", longitude, latitude); } } }; }
在MainPageViewModel类中,我们添加一个PropertyChanged事件,用于监听CurrentLocation属性的改变。
当手指滑动地图触发位置变化,导致CurrentLocation属性改变时,将当前的中心点转换为具体的地址。这里使用了高德逆地理编码API服务(https://restapi.amap.com/v3/geocode/regeo)解析CurrentLocation的值, 还需使用了防抖策略,避免接口的频繁调用。
1
2
3
4
5
6
7
8
9
10
11
12
13
14
15
16
17
18
19
20
21
22
23
24
25
26
27
28
29
30
31
32
33
34
35
36
37
38
39
40
41
42
43
44
45
46
47
48
49
50
51
52
53
54
55
56
57
58
public MainPageViewModel() { PropertyChanged+=MainPageViewModel_PropertyChanged; ... } private async void MainPageViewModel_PropertyChanged(object sender, System.ComponentModel.PropertyChangedEventArgs e) { if (e.PropertyName == nameof(CurrentLocation)) { if (CurrentLocation!=null) { // 使用防抖 using (await asyncLock.LockAsync()) { var amapLocation = new Location.Location() { Latitude=CurrentLocation.Latitude, Longitude=CurrentLocation.Longitude }; var amapInverseHttpRequestParamter = new AmapInverseHttpRequestParamter() { Locations= new Location.Location[] { amapLocation } }; ReGeocodeLocation reGeocodeLocation = null; try { reGeocodeLocation = await amapHttpRequestClient.InverseAsync(amapInverseHttpRequestParamter); } catch (Exception ex) { Console.WriteLine(ex.ToString()); } throttledAction.Update(() => { MainThread.BeginInvokeOnMainThread(() => { CurrentLocation=amapLocation; if (reGeocodeLocation!=null) { Address = reGeocodeLocation.Address; Pois=new ObservableCollection<Poi>(reGeocodeLocation.Pois); } }); }); throttledAction.Invoke(); } } } }
至此我们完成了地图组件的基本功能。
创建交互逻辑 在MainPage.xaml中,创建一个选择器按钮,以及一个卡片模拟选择器按钮点击后的弹窗。
1
2
3
4
5
6
7
8
9
10
11
12
13
14
15
16
17
18
19
20
21
22
23
24
25
26
27
28
29
30
31
32
33
34
35
36
37
38
39
40
41
42
43
44
45
46
47
48
49
50
51
52
53
54
55
56
57
58
59
60
61
62
63
64
65
66
67
68
69
70
71
72
73
74
75
76
77
78
79
80
81
82
83
84
85
86
87
88
89
90
91
92
93
94
95
<Button Clicked="Button_Clicked" Grid.Row="1" x:Name="SelectorButton" HorizontalOptions="Center" VerticalOptions="Center" Text="{Binding Address, TargetNullValue=请选择地点}"></Button> <Border StrokeShape="RoundRectangle 10" Grid.RowSpan="2" x:Name="SelectorPopup" IsVisible="False" Margin="5,50" MinimumHeightRequest="500"> <Grid Padding="0"> <Grid.RowDefinitions> <RowDefinition Height="Auto"></RowDefinition> <RowDefinition Height="Auto"></RowDefinition> <RowDefinition></RowDefinition> </Grid.RowDefinitions> <Grid Grid.Row="0"> <Grid.ColumnDefinitions> <ColumnDefinition Width="*"></ColumnDefinition> <ColumnDefinition></ColumnDefinition> </Grid.ColumnDefinitions> <Label FontSize="Large" Margin="10, 10, 10, 0" FontAttributes="Bold" Text="选择地点"></Label> <HorizontalStackLayout Grid.Column="1" HorizontalOptions="End"> <Button Text="删除" Margin="5,0" Command="{Binding Remove}"></Button> <Button Text="完成" Margin="5,0" Command="{Binding Done}"></Button> </HorizontalStackLayout> </Grid> <Grid Grid.Row="1" Margin="10, 10, 10, 0"> <Grid.RowDefinitions> <RowDefinition></RowDefinition> <RowDefinition Height="Auto"></RowDefinition> </Grid.RowDefinitions> <Label HorizontalTextAlignment="Center" VerticalOptions="Center" x:Name="ContentLabel" Text="{Binding Address}"></Label> <Border IsVisible="False" Grid.RowSpan="2" x:Name="ContentFrame"> <Entry Text="{Binding Address, Mode=TwoWay}" Placeholder="请输入地址, 按Enter键完成" Completed="Entry_Completed" Unfocused="Entry_Unfocused" ClearButtonVisibility="WhileEditing"></Entry> </Border> <Border x:Name="ContentButton" Grid.Row="1" HorizontalOptions="Center" VerticalOptions="Center"> <Label> <Label.FormattedText> <FormattedString> <Span FontFamily="FontAwesome" Text=""></Span> <Span Text=" 修改"></Span> </FormattedString> </Label.FormattedText> </Label> <Border.GestureRecognizers> <TapGestureRecognizer Tapped="TapGestureRecognizer_Tapped"> </TapGestureRecognizer> </Border.GestureRecognizers> </Border> </Grid> <BlazorWebView Grid.Row="2" Margin="-10, 0" x:Name="mainMapBlazorWebView" HostPage="wwwroot/amap_index.html"> <BlazorWebView.RootComponents> <RootComponent Selector="#app" x:Name="rootComponent" ComponentType="{x:Type views:AMapPage}" /> </BlazorWebView.RootComponents> </BlazorWebView> </Grid> </Border>
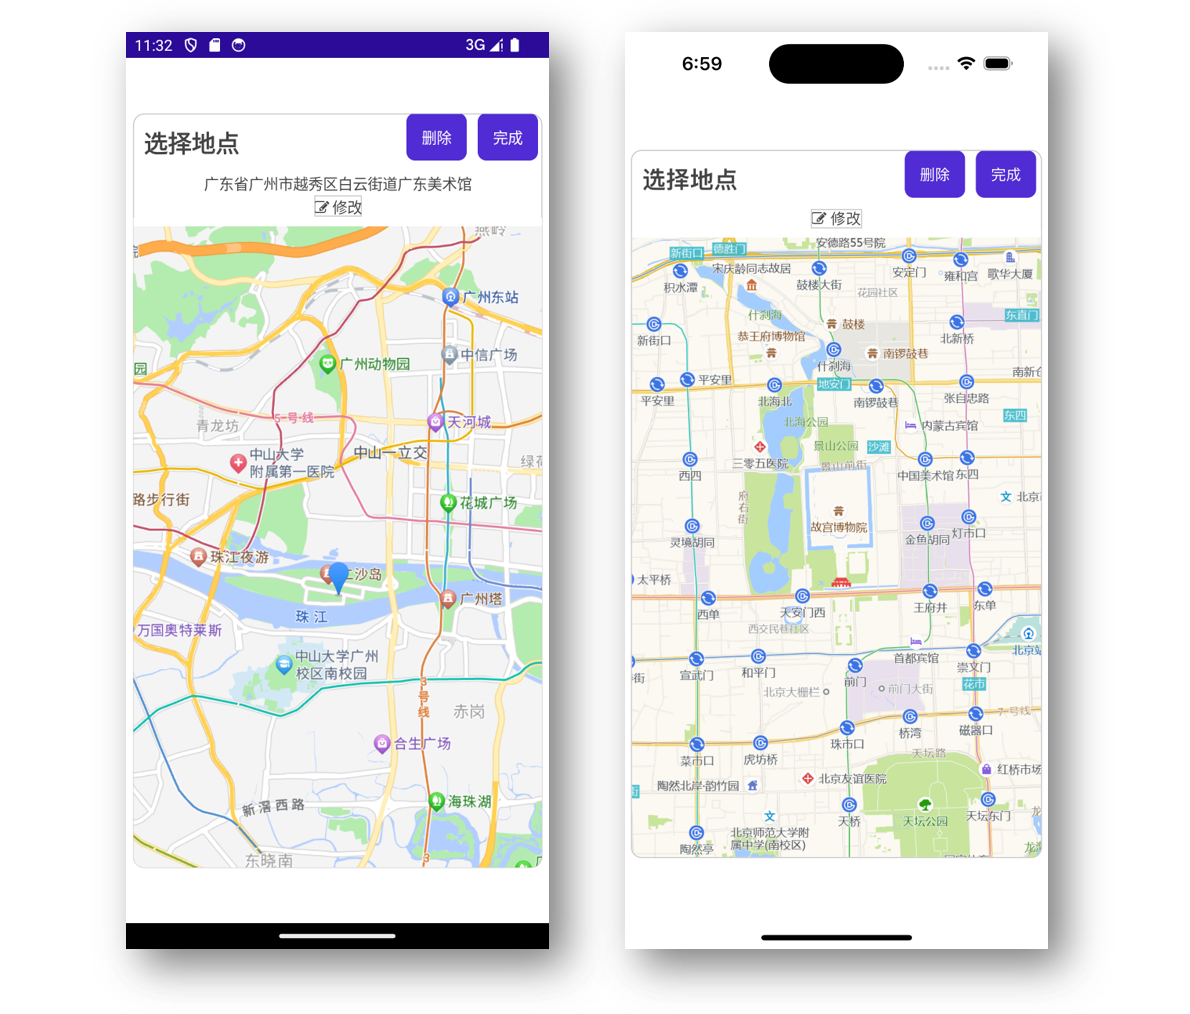
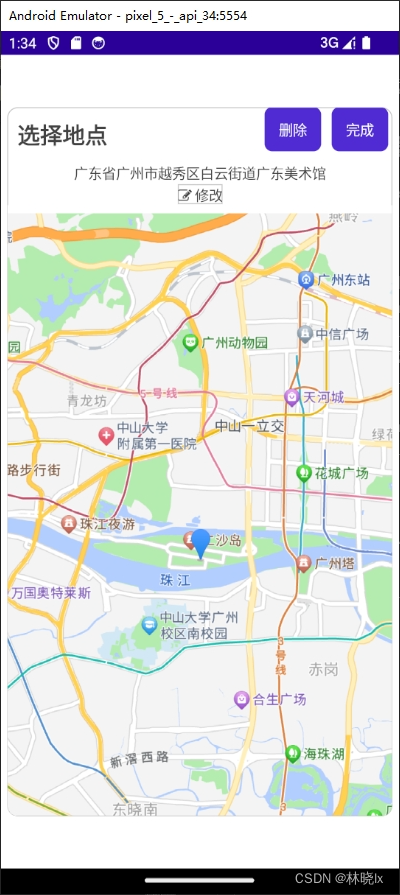
最终效果如下:
项目地址 Github:maui-samples
