富文本编辑器是一种所见即所得(what you see is what you get 简称 WYSIWYG)文本编辑器,用户在编辑器中输入内容和所做的样式修改,都会直接反映在编辑器中。
在Web端常见的有Quill 、TinyMCE 这些开源免费的富文本编辑器,而目前.NET MAUI 方面没有类似的富文本编辑器可以免费使用。
使用.NET MAUI实现一个富文本编辑器并不难,今天就来写一个
使用.NET MAU 实现跨平台支持,本项目可运行于Android、iOS平台。由于篇幅本文只展示Android平台的代码。
原理 .NET MAUI提供了编辑器 控件,允许输入和编辑多行文本,虽然提供了字号,字体,颜色等控件属性,但我们无法为每个字符设置样式。我们将通过原生控件提供的范围选择器实现这一功能。
.NET MAUI提供了Handler 的跨平台特性,我们将利用Handler实现所见即所得内容编辑器组件。这篇博文介绍了如何用Handler实现自定义跨平台控件,请阅读[MAUI程序设计] 用Handler实现自定义跨平台控件
在各平台中,我们将使用原生控件实现所见即所得的内容编辑器
创建编辑器 新建.NET MAUI项目,命名RichTextEditor
在Controls目录中创建WysiwygContentEditor,继承自Editor,用于实现所见即所得的内容编辑器
构造函数中注册HandlerChanged和HandlerChanging事件
1
2
3
4
5
6
7
8
9
10
11
public class WysiwygContentEditor : Editor { public WysiwygContentEditor() { HandlerChanged+=WysiwygContentEditor_HandlerChanged; HandlerChanging+=WysiwygContentEditor_HandlerChanging; } }
在HandlerChanged事件中,获取Handler对象,通过它访问虚拟视图和本机视图。
1
2
3
4
5
6
7
private void WysiwygContentEditor_HandlerChanged(object sender, EventArgs e) { var handler = Handler; if (handler != null) { } }
android端原生控件为AppCompatEditText,iOS端原生控件为UITextView
1
2
3
4
//Android var platformView = handler.PlatformView as AppCompatEditText; //iOS var platformView = handler.PlatformView as UITextView;
不同平台的代码,通过.Net6的条件编译实现,有关条件编译的详细信息,请参考官方文档 。这次实现的是Android和iOS平台,所以在代码中条件编译语句如下
1
2
3
4
5
6
7
8
9
10
11
12
13
14
15
16
#if ANDROID //android codes ... #endif #if IOS //iOS codes ... #endif
定义 定义StyleType枚举,用于控件可以处理的文本样式更改请求类型。
underline:字体下划线
italic:字体斜体
bold:字体加粗
backgoundColor:字体背景色
foregroundColor:字体前景色
size:字体大小
1
2
3
4
5
6
public enum StyleType { underline, italic, bold, backgoundColor, foregroundColor, size }
以及StyleArgs类,用于传递样式变更请求的参数
1
2
3
4
5
6
7
8
9
10
11
public class StyleArgs : EventArgs { public StyleType Style; public string Params; public StyleArgs(StyleType style, string @params = null) { Style = style; Params=@params; } }
定义SelectionArgs类,用于传递选择范围变更请求的参数
1
2
3
4
5
6
7
8
9
10
public class SelectionArgs : EventArgs { public int Start; public int End; public SelectionArgs(int start, int end) { Start = start; End = end; } }
定义事件用于各平台本机代码的调用
1
2
3
4
public event EventHandler GetHtmlRequest; public event EventHandler<string> SetHtmlRequest; public event EventHandler<StyleArgs> StyleChangeRequested; public event EventHandler<SelectionArgs> SelectionChangeHandler;
创建StyleChangeRequested的订阅事件以响应样式变更请求,对应不同的样式类型,调用不同的方法实现样式变更。
1
2
3
4
5
6
7
8
9
10
11
12
13
14
15
16
17
18
19
20
21
22
23
24
25
26
27
28
29
30
31
32
33
34
35
StyleChangeRequested =new EventHandler<StyleArgs>( (sender, e) => { var EditableText = platformView.EditableText; switch (e.Style) { case StyleType.underline: UpdateUnderlineSpans(EditableText); break; case StyleType.italic: UpdateStyleSpans(TypefaceStyle.Italic, EditableText); break; case StyleType.bold: UpdateStyleSpans(TypefaceStyle.Bold, EditableText); break; case StyleType.backgoundColor: UpdateBackgroundColorSpans(EditableText, Microsoft.Maui.Graphics.Color.FromArgb(e.Params)); break; case StyleType.foregroundColor: UpdateForegroundColorSpans(EditableText, Microsoft.Maui.Graphics.Color.FromArgb(e.Params)); break; case StyleType.size: UpdateAbsoluteSizeSpanSpans(EditableText, int.Parse(e.Params)); break; default: break; } });
实现复合样式 选择范围 android端使用SelectionStart和SelectionEnd获取选择范围,iOS端使用SelectedRange获取选择范围
1
2
3
4
5
6
7
8
9
//Android int getSelectionStart() => platformView.SelectionStart; int getSelectionEnd() => platformView.SelectionEnd; //iOS NSRange getSelectionRange() => platformView.SelectedRange;
字号 MAUI控件中字号使用FontSize属性单位为逻辑像素,与DPI设置相关联。
1
2
3
4
5
6
7
8
9
10
void UpdateAbsoluteSizeSpanSpans(IEditable EditableText, int size) { var spanType = SpanTypes.InclusiveInclusive; EditableText.SetSpan(new AbsoluteSizeSpan(size, true), getSelectionStart(), getSelectionEnd(), spanType); SetEditableText(EditableText, platformView); }
字体颜色与背景色 Android平台中,字体颜色与背景色通过为EditableText对象设置ForegroundColorSpan和BackgroundColorSpan实现
1
2
3
4
5
6
7
8
9
10
11
12
13
14
void UpdateForegroundColorSpans(IEditable EditableText, Microsoft.Maui.Graphics.Color color) { var spanType = SpanTypes.InclusiveInclusive; EditableText.SetSpan(new ForegroundColorSpan(color.ToAndroid()), getSelectionStart(), getSelectionEnd(), spanType); SetEditableText(EditableText, platformView); } void UpdateBackgroundColorSpans(IEditable EditableText, Microsoft.Maui.Graphics.Color color) { var spanType = SpanTypes.InclusiveInclusive; EditableText.SetSpan(new BackgroundColorSpan(color.ToAndroid()), getSelectionStart(), getSelectionEnd(), spanType); SetEditableText(EditableText, platformView); }
字体下划线 将选择文本选择范围内若包含下划线,则移除下划线,否则添加下划线
Android平台中通过为EditableText对象设置UnderlineSpan实现为文本添加下划线,通过RemoveSpan方法可以移除下划线,
但选择范围可能已包含下划线片段的一部分,因此移除此下划线片段后,需要重新添加下划线片段,以实现部分移除的效果
1
2
3
4
5
6
7
8
9
10
11
12
13
14
15
16
17
18
19
20
21
22
23
24
25
26
27
28
29
30
31
32
33
34
35
36
37
38
39
40
41
42
43
44
45
46
47
48
49
50
51
void UpdateUnderlineSpans(IEditable EditableText) { var underlineSpans = EditableText.GetSpans(getSelectionStart(), getSelectionEnd(), Java.Lang.Class.FromType(typeof(UnderlineSpan))); bool hasFlag = false; var spanType = SpanTypes.InclusiveInclusive; foreach (var span in underlineSpans) { hasFlag = true; var spanStart = EditableText.GetSpanStart(span); var spanEnd = EditableText.GetSpanEnd(span); var newStart = spanStart; var newEnd = spanEnd; var startsBefore = false; var endsAfter = false; if (spanStart < getSelectionStart()) { newStart = getSelectionStart(); startsBefore = true; } if (spanEnd > getSelectionEnd()) { newEnd = getSelectionEnd(); endsAfter = true; } EditableText.RemoveSpan(span); if (startsBefore) { EditableText.SetSpan(new UnderlineSpan(), spanStart, newStart, SpanTypes.ExclusiveExclusive); } if (endsAfter) { EditableText.SetSpan(new UnderlineSpan(), newEnd, spanEnd, SpanTypes.ExclusiveExclusive); } } if (!hasFlag) { EditableText.SetSpan(new UnderlineSpan(), getSelectionStart(), getSelectionEnd(), spanType); } SetEditableText(EditableText, platformView); }
字体加粗与斜体 Android平台中,字体粗细与斜体通过为EditableText对象设置StyleSpan实现,与设置字体下划线一样,需要处理选择范围内已包含StyleSpan的情况
TypefaceStyle提供了Normal、Bold、Italic、BoldItalic四种字体样式,粗体+斜体样式是通过组合实现的,因此需要处理样式叠加问题
1
2
3
4
5
6
7
8
9
10
11
12
13
14
15
16
17
18
19
20
21
22
23
24
25
26
27
28
29
30
31
32
33
34
35
36
37
38
39
40
41
42
43
44
45
46
47
48
49
50
51
52
53
54
55
56
57
58
59
60
61
62
void UpdateStyleSpans(TypefaceStyle flagStyle, IEditable EditableText) { var styleSpans = EditableText.GetSpans(getSelectionStart(), getSelectionEnd(), Java.Lang.Class.FromType(typeof(StyleSpan))); bool hasFlag = false; var spanType = SpanTypes.InclusiveInclusive; foreach (StyleSpan span in styleSpans) { var spanStart = EditableText.GetSpanStart(span); var spanEnd = EditableText.GetSpanEnd(span); var newStart = spanStart; var newEnd = spanEnd; var startsBefore = false; var endsAfter = false; if (spanStart < getSelectionStart()) { newStart = getSelectionStart(); startsBefore = true; } if (spanEnd > getSelectionEnd()) { newEnd = getSelectionEnd(); endsAfter = true; } if (span.Style == flagStyle) { hasFlag = true; EditableText.RemoveSpan(span); EditableText.SetSpan(new StyleSpan(TypefaceStyle.Normal), newStart, newEnd, spanType); } else if (span.Style == TypefaceStyle.BoldItalic) { hasFlag = true; EditableText.RemoveSpan(span); var flagLeft = TypefaceStyle.Bold; if (flagStyle == TypefaceStyle.Bold) { flagLeft = TypefaceStyle.Italic; } EditableText.SetSpan(new StyleSpan(flagLeft), newStart, newEnd, spanType); } if (startsBefore) { EditableText.SetSpan(new StyleSpan(span.Style), spanStart, newStart, SpanTypes.ExclusiveExclusive); } if (endsAfter) { EditableText.SetSpan(new StyleSpan(span.Style), newEnd, spanEnd, SpanTypes.ExclusiveExclusive); } } if (!hasFlag) { EditableText.SetSpan(new StyleSpan(flagStyle), getSelectionStart(), getSelectionEnd(), spanType); } SetEditableText(EditableText, platformView); }
序列化和反序列化 所见即所得的内容需要被序列化和反序列化以便存储或传输,我们仍然使用HTML作为中间语言,好在Android和iOS平台都有HTML互转的对应实现。
Android平台中,Android.Text.Html提供了FromHtml()和Html.ToHtml(),
iOS中的NSAttributedStringDocumentAttributes提供了DocumentType属性,可以设置为NSHTMLTextDocumentType,使用它初始化AttributedString或调用AttributedString.GetDataFromRange()方法实现HTML和NSAttributedString的互转。
跨平台实现 在Platform/Android目录下创建HtmlParser.Android作为Android平台序列化和反序列化的实现。
1
2
3
4
5
6
7
8
9
10
11
12
13
14
public static class HtmlParser_Android { public static ISpanned HtmlToSpanned(string htmlString) { ISpanned spanned = Html.FromHtml(htmlString, FromHtmlOptions.ModeCompact); return spanned; } public static string SpannedToHtml(ISpanned spanned) { string htmlString = Html.ToHtml(spanned, ToHtmlOptions.ParagraphLinesIndividual); return htmlString; } }
在Platform/iOS目录下创建HtmlParser.iOS作为iOS平台序列化和反序列化的实现。
1
2
3
4
5
6
7
8
9
10
11
12
13
14
15
16
17
18
19
20
21
22
23
24
25
26
27
28
29
30
31
32
33
34
35
36
37
38
39
40
41
42
43
44
45
46
47
48
49
50
51
52
53
54
55
56
57
58
59
60
61
62
63
64
65
66
67
68
69
70
71
72
73
74
75
76
77
78
79
80
81
public static class HtmlParser_iOS { static nfloat defaultSize = UIFont.SystemFontSize; static UIFont defaultFont; public static NSAttributedString HtmlToAttributedString(string htmlString) { var nsString = new NSString(htmlString); var data = nsString.Encode(NSStringEncoding.UTF8); var dictionary = new NSAttributedStringDocumentAttributes(); dictionary.DocumentType = NSDocumentType.HTML; NSError error = new NSError(); var attrString = new NSAttributedString(data, dictionary, ref error); var mutString = ResetFontSize(new NSMutableAttributedString(attrString)); return mutString; } static NSAttributedString ResetFontSize(NSMutableAttributedString attrString) { defaultFont = UIFont.SystemFontOfSize(defaultSize); attrString.EnumerateAttribute(UIStringAttributeKey.Font, new NSRange(0, attrString.Length), NSAttributedStringEnumeration.None, (NSObject value, NSRange range, ref bool stop) => { if (value != null) { var oldFont = (UIFont)value; var oldDescriptor = oldFont.FontDescriptor; var newDescriptor = defaultFont.FontDescriptor; bool hasBoldFlag = false; bool hasItalicFlag = false; if (oldDescriptor.SymbolicTraits.HasFlag(UIFontDescriptorSymbolicTraits.Bold)) { hasBoldFlag = true; } if (oldDescriptor.SymbolicTraits.HasFlag(UIFontDescriptorSymbolicTraits.Italic)) { hasItalicFlag = true; } if (hasBoldFlag && hasItalicFlag) { uint traitsInt = (uint)UIFontDescriptorSymbolicTraits.Bold + (uint)UIFontDescriptorSymbolicTraits.Italic; newDescriptor = newDescriptor.CreateWithTraits((UIFontDescriptorSymbolicTraits)traitsInt); } else if (hasBoldFlag) { newDescriptor = newDescriptor.CreateWithTraits(UIFontDescriptorSymbolicTraits.Bold); } else if (hasItalicFlag) { newDescriptor = newDescriptor.CreateWithTraits(UIFontDescriptorSymbolicTraits.Italic); } var newFont = UIFont.FromDescriptor(newDescriptor, defaultSize); attrString.RemoveAttribute(UIStringAttributeKey.Font, range); attrString.AddAttribute(UIStringAttributeKey.Font, newFont, range); } }); return attrString; } public static string AttributedStringToHtml(NSAttributedString attributedString) { var range = new NSRange(0, attributedString.Length); var dictionary = new NSAttributedStringDocumentAttributes(); dictionary.DocumentType = NSDocumentType.HTML; NSError error = new NSError(); var data = attributedString.GetDataFromRange(range, dictionary, ref error); var htmlString = new NSString(data, NSStringEncoding.UTF8); return htmlString; } }
集成至编辑器 在所见即所得编辑器中设置两个方法,一个用于获取编辑器中的内容,一个用于设置编辑器中的内容。
1
2
3
4
5
6
7
8
9
10
11
12
13
14
15
public void SetHtmlText(string htmlString) { HtmlString = htmlString; SetHtmlRequest(this, htmlString); } public string GetHtmlText() { GetHtmlRequest(this, new EventArgs()); return HtmlString; }
在HandlerChanged事件方法中的各平台代码段中添加如下代码:
1
2
3
4
5
6
7
8
9
10
11
12
13
14
GetHtmlRequest = new EventHandler( (sender, e) => { var editor = (WysiwygContentEditor)sender; HtmlString=HtmlParser_Android.SpannedToHtml(platformView.EditableText); } ); SetHtmlRequest =new EventHandler<string>( (sender, htmlString) => { platformView.TextFormatted = HtmlParser_Android.HtmlToSpanned(htmlString); } );
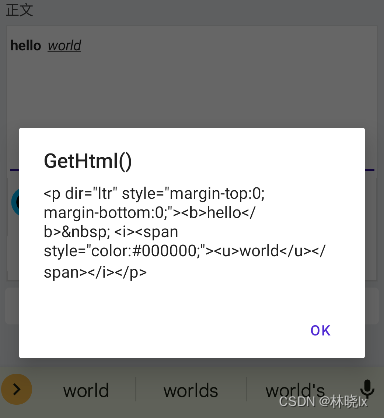
在富文本编辑器中的内容,最终会生成一个带有内联样式的HTML字符串,如下所示:
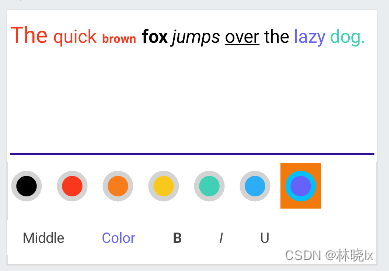
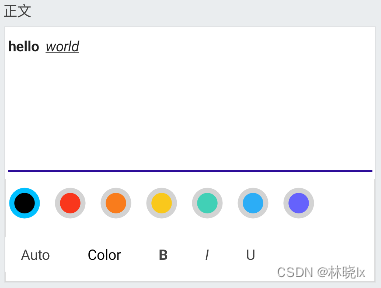
创建控件 控件由所见即所得编辑器和工具栏组成,所见即所得编辑器用于显示和编辑内容,工具栏用于设置字号、颜色、加粗、斜体、下划线
创建RichTextEditor的带有Xaml的ContentView。将所见即所得编辑器放置中央,工具栏放置在底部。
1
2
3
4
5
6
7
8
9
10
11
12
13
14
15
16
17
18
19
20
<ContentView xmlns="http://schemas.microsoft.com/dotnet/2021/maui" xmlns:x="http://schemas.microsoft.com/winfx/2009/xaml" xmlns:controls="clr-namespace:RichTextEditor.Controls;assembly=RichTextEditor" x:Class="RichTextEditor.Controls.RichTextEditor"> <Border> <Grid> <Grid.RowDefinitions> <RowDefinition Height="1*"></RowDefinition> <RowDefinition Height="Auto"></RowDefinition> <RowDefinition Height="Auto"></RowDefinition> </Grid.RowDefinitions> <controls:WysiwygContentEditor MinimumHeightRequest="150" AutoSize="TextChanges" BackgroundColor="{StaticResource PhoneContrastBackgroundBrush}" IsSpellCheckEnabled="false" x:Name="MainEditor"></controls:WysiwygContentEditor> </Grid> </Border> </ContentView>
工具栏内的按钮横向排列
1
2
3
4
5
6
7
8
9
10
11
12
13
14
15
16
17
18
19
20
21
22
23
24
25
26
27
28
<HorizontalStackLayout Grid.Row="3" Spacing="5" Margin="0,10"> <Button Text="{Binding Source={x:Reference TextSizeCollectionView}, Path=SelectedItem.Name, FallbackValue=Auto}" Style="{StaticResource RichTextButtonStyle}" Clicked="TextSizeButton_Clicked" x:Name="TextSizeButton"></Button> <Button Text="Color" TextColor="{Binding Source={x:Reference ColorCollectionView}, Path=SelectedItem}" Style="{StaticResource RichTextButtonStyle}" Clicked="TextColorButton_Clicked" x:Name="TextColorButton"></Button> <Button Text="B" Style="{StaticResource RichTextButtonStyle}" FontAttributes="Bold" x:Name="BoldButton" Clicked="BoldButton_Clicked"></Button> <Button Text="I" Style="{StaticResource RichTextButtonStyle}" FontAttributes="Italic" x:Name="ItalicButton" Clicked="ItalicButton_Clicked"></Button> <Button Text="U" Style="{StaticResource RichTextButtonStyle}" FontAttributes="None" x:Name="UnderLineButton" Clicked="UnderLineButton_Clicked"></Button> </HorizontalStackLayout>
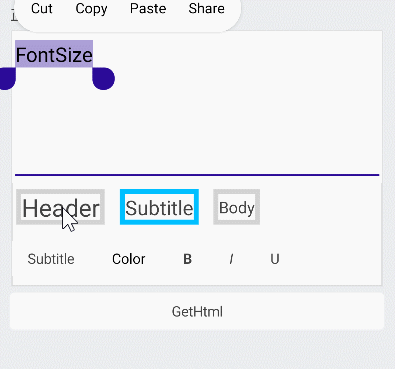
配置两个选择器:TextSizeCollectionView为字体大小选择器,ColorCollectionView为字体颜色选择器。
当点击字体大小选择器时,弹出字体大小选择器,当点击字体颜色选择器时,弹出字体颜色选择器。
1
2
3
4
5
6
7
8
9
10
11
12
13
14
15
16
17
18
19
20
21
22
23
24
25
26
27
28
29
30
31
32
33
34
35
36
37
38
39
40
41
42
43
44
45
46
47
48
49
50
51
52
53
54
55
56
<VerticalStackLayout x:Name="OptionsLayout" Grid.Row="2" Spacing="5"> <CollectionView x:Name="TextSizeCollectionView" Background="Transparent" SelectionChanged="TextSizeCollectionView_SelectionChanged" SelectionMode="Single" HeightRequest="45"> <CollectionView.ItemsLayout> <LinearItemsLayout Orientation="Horizontal" ItemSpacing="5"></LinearItemsLayout> </CollectionView.ItemsLayout> <CollectionView.ItemTemplate> <DataTemplate> <Border x:Name="TargetElement" Style="{StaticResource SelectableLayoutStyle}" Background="{StaticResource PhoneContrastBackgroundBrush}" Padding="5,0"> <Label Text="{Binding Name}" TextColor="{StaticResource PhoneForegroundBrush}" VerticalOptions="Center" FontSize="{Binding Value}"></Label> </Border> </DataTemplate> </CollectionView.ItemTemplate> </CollectionView> <CollectionView x:Name="ColorCollectionView" SelectionChanged="ColorCollectionView_SelectionChanged" SelectionMode="Single" HeightRequest="45"> <CollectionView.ItemsLayout> <LinearItemsLayout Orientation="Horizontal" ItemSpacing="5"></LinearItemsLayout> </CollectionView.ItemsLayout> <CollectionView.ItemTemplate> <DataTemplate> <Border x:Name="TargetElement" Style="{StaticResource SelectableLayoutStyle}" BackgroundColor="{Binding}" WidthRequest="40" HeightRequest="40" StrokeShape="RoundRectangle 40"> </Border> </DataTemplate> </CollectionView.ItemTemplate> </CollectionView> </VerticalStackLayout>
后端代码,绑定一些默认值
1
2
3
4
5
6
7
8
9
10
11
12
13
14
15
16
17
public static List<Color> DefaultTextColorList = new List<Color>() { Color.FromArgb("#000000"), Color.FromArgb("#F9371C"), Color.FromArgb("#F97C1C"), Color.FromArgb("#F9C81C"), Color.FromArgb("#41D0B6"), Color.FromArgb("#2CADF6"), Color.FromArgb("#6562FC") }; public static List<TextSize> DefaultTextSizeList = new List<TextSize>() { new TextSize(){Name="Large", Value=22}, new TextSize(){Name="Middle", Value=18}, new TextSize(){Name="Small", Value=12}, };
效果如下:
使用控件 在MainPage中使用RichTextEditor,代码如下
1
2
3
4
5
6
<controls:RichTextEditor x:Name="MainRichTextEditor" Text="{Binding Content}" Placeholder="{Binding PlaceHolder}"></controls:RichTextEditor>
用MainRichTextEditor.GetHtmlText()测试获取富文本编辑器Html序列化功能。
1
2
3
4
5
private async void Button_Clicked(object sender, EventArgs e) { var html = this.MainRichTextEditor.GetHtmlText(); await DisplayAlert("GetHtml()", html, "OK"); }
最终效果
已知问题 项目地址 我在maui-sample项目中的一些控件,打算做成一个控件库,方便大家使用。控件库地址在下方。
maui-sample项目作为控件库孵化器,代码可能会有点乱,也没有经过严格的测试。当控件完善到一定程度,我会把控件封装起来放到控件库中。如果你有好的控件,欢迎pull request。
maui-sample:Github:maui-samples
Mato.Maui控件库Mato.Maui