[MAUI]集成富文本编辑器Editor.js至.NET MAUI Blazor项目

Editor.js 是一个基于 Web 的所见即所得富文本编辑器,它由CodeX团队开发。之前写过一篇博文专门介绍过这个编辑器,可以回看:开源好用的所见即所得(WYSIWYG)编辑器:Editor.js

.NET MAUI Blazor允许使用 Web UI 生成跨平台本机应用。 组件在 .NET 进程中以本机方式运行,并使用本地互操作通道将 Web UI 呈现到嵌入式 Web 视图控件(BlazorWebView)。

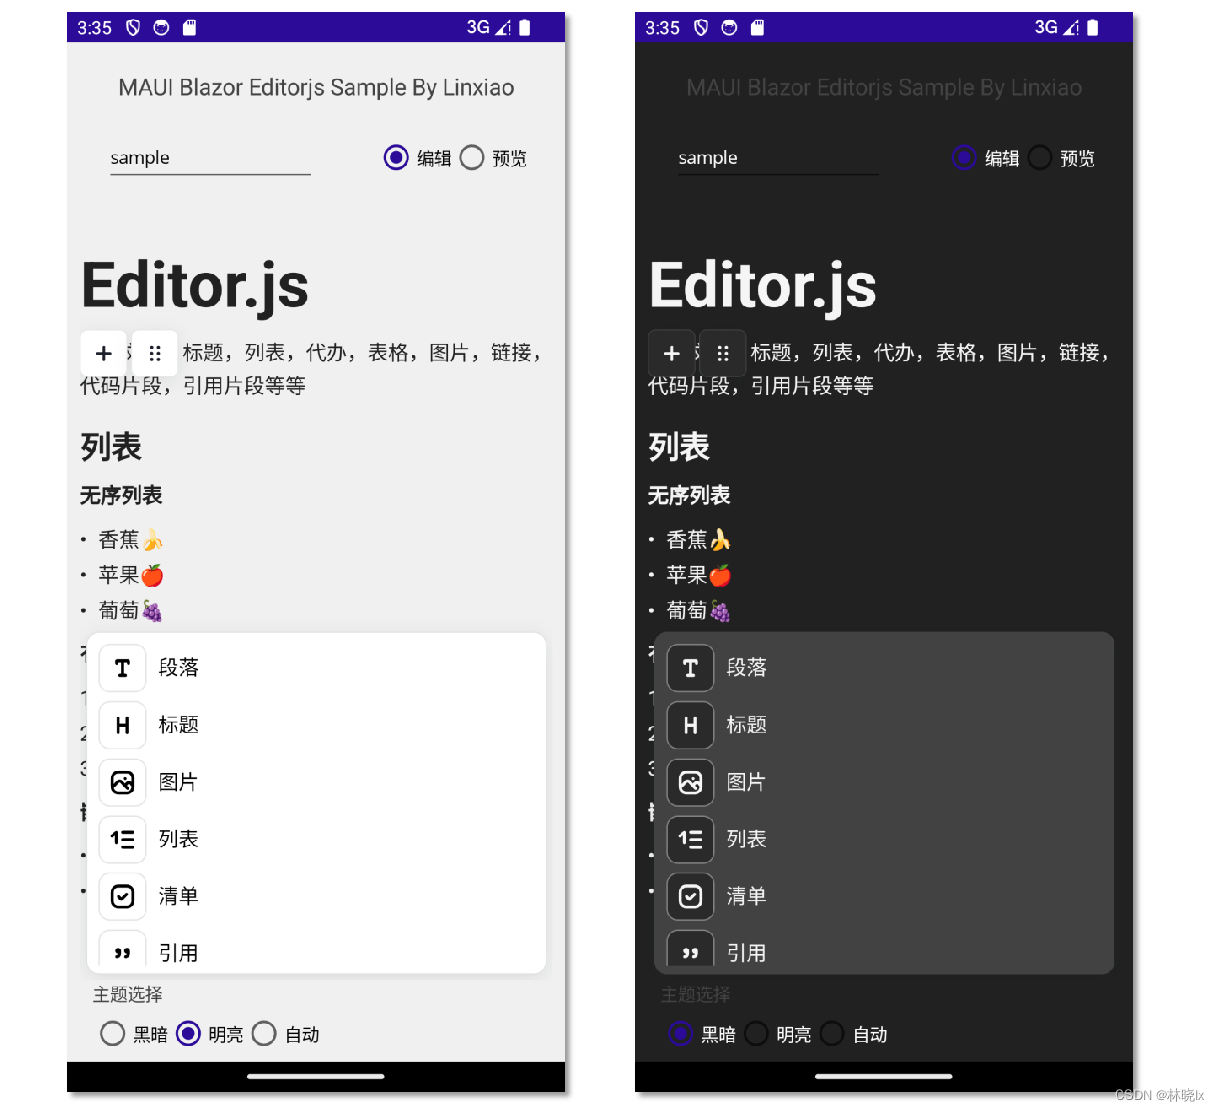
这次我们将Editor.js集成到.NET MAUI应用中。并实现只读切换,明/暗主题切换等功能。

在这里插入图片描述

使用.NET MAUI实现跨平台支持,本项目可运行于Android、iOS平台。

获取资源

我们先要获取web应用的资源文件(js,css等),以便MAUI的视图呈现标准的Web UI。有两种方式可以获取:

  1. 从源码构建
  2. 从CDN获取

从源码构建

此方法需要首先安装nodejs

克隆Editorjs项目到本地

1
git clone https://github.com/codex-team/editor.js.git

运行

1
npm i

以及

1
npm run build

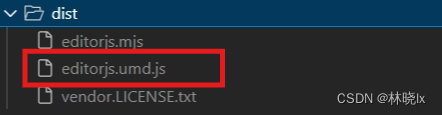
等待nodejs构建完成,在项目根目录找到dist/editorjs.umd.js这个就是我们需要的js文件

在这里插入图片描述

从CDN获取

从官方CDN获取:

1
https://cdn.jsdelivr.net/npm/@editorjs/editorjs@latest

获取扩展插件

Editor.js中的每个块都由插件提供。有简单的外部脚本,有自己的逻辑。默认Editor.js项目中已包含唯一的 Paragraph 块。其它的工具插件可以单独获取。

同样我们可以找到这些插件的源码编译,或通过CDN获取:

  1. Header
  2. 链接
  3. HTML块
  4. 简单图片(无后端要求)
  5. 图片
  6. 清单
  7. 列表
  8. 嵌入
  9. 引用

创建项目

新建.NET MAUI Blazor项目,命名Editorjs

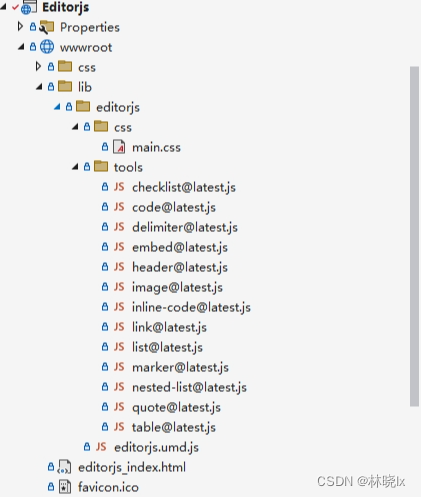
将editorjs.umd.js和各插件js文件拷贝至项目根目录下wwwroot文件夹,文件结构如下:

在这里插入图片描述

在wwwroot创建editorjs_index.html文件,并在body中引入editorjs.umd.js和各插件js文件

1
2
3
4
5
6
7
8
9
10
11
12
13
14
15
16
<body>
...
<script src="lib/editorjs/editorjs.umd.js"></script>
<script src="lib/editorjs/tools/checklist@latest.js"></script>
<script src="lib/editorjs/tools/code@latest.js"></script>
<script src="lib/editorjs/tools/delimiter@latest.js"></script>
<script src="lib/editorjs/tools/embed@latest.js"></script>
<script src="lib/editorjs/tools/header@latest.js"></script>
<script src="lib/editorjs/tools/image@latest.js"></script>
<script src="lib/editorjs/tools/inline-code@latest.js"></script>
<script src="lib/editorjs/tools/link@latest.js"></script>
<script src="lib/editorjs/tools/nested-list@latest.js"></script>
<script src="lib/editorjs/tools/marker@latest.js"></script>
<script src="lib/editorjs/tools/quote@latest.js"></script>
<script src="lib/editorjs/tools/table@latest.js"></script>
</body>

创建控件

创建 EditNotePage.xaml ,EditNotePage类作为视图控件,继承于ContentView,EditNotePage.xaml的完整代码如下:

1
2
3
4
5
6
7
8
9
10
11
12
13
14
15
16
17
18
19
20
21
22
23
24
25
26
27
28
29
30
31
32
33
34
35
36
37
38
39
40
41
42
43
44
45
46
47
48
49
50
51
52
53
54
55
56
57
58
59
60
61
62
63
64
65
66
67
68
69
<ContentView xmlns="http://schemas.microsoft.com/dotnet/2021/maui"
xmlns:x="http://schemas.microsoft.com/winfx/2009/xaml"
xmlns:mato="clr-namespace:Editorjs;assembly=Editorjs"
xmlns:service="clr-namespace:Editorjs.ViewModels;assembly=Editorjs"
xmlns:xct="http://schemas.microsoft.com/dotnet/2022/maui/toolkit"
x:Name="MainPage"
x:Class="Editorjs.Controls.EditNotePage">
<Grid BackgroundColor="{AppThemeBinding Light={StaticResource LightPageBackgroundColor}, Dark={StaticResource DarkPageBackgroundColor}}"
RowDefinitions="Auto, *, Auto"
Padding="20, 10, 20, 0">
<Grid Grid.Row="0"
Margin="0, 0, 0, 10">
<Grid.ColumnDefinitions>
<ColumnDefinition Width="auto"></ColumnDefinition>
<ColumnDefinition></ColumnDefinition>
</Grid.ColumnDefinitions>

<Entry Grid.Column="1"
Placeholder="请输入标题"
Margin="10, 0, 0, 0"
VerticalOptions="Center"
Text="{Binding Title}"
>
</Entry>


<HorizontalStackLayout Grid.Column="2"
HeightRequest="60"
VerticalOptions="Center"
HorizontalOptions="End"
Margin="0, 0, 10, 0">
<StackLayout RadioButtonGroup.GroupName="State"
RadioButtonGroup.SelectedValue="{Binding NoteSegmentState,Mode=TwoWay}"
Orientation="Horizontal">
<RadioButton Value="{x:Static service:NoteSegmentState.Edit}"
Content="编辑">

</RadioButton>
<RadioButton Value="{x:Static service:NoteSegmentState.PreView}"
Content="预览">

</RadioButton>


</StackLayout>

</HorizontalStackLayout>


</Grid>

<BlazorWebView Grid.Row="1"
Margin="-10, 0"
x:Name="mainMapBlazorWebView"
HostPage="wwwroot/editorjs_index.html">
<BlazorWebView.RootComponents>
<RootComponent Selector="#app"
x:Name="rootComponent"
ComponentType="{x:Type mato:EditorjsPage}" />
</BlazorWebView.RootComponents>
</BlazorWebView>


<ActivityIndicator Grid.RowSpan="4"
IsRunning="{Binding Loading}"></ActivityIndicator>
</Grid>
</ContentView>

创建一个EditNotePageViewModel的ViewModel类,用于处理页面逻辑。代码如下:

1
2
3
4
5
6
7
8
9
10
11
12
13
14
15
16
17
18
19
20
21
22
23
24
25
26
27
28
29
30
31
32
33
34
35
36
37
38
39
40
41
42
43
44
45
46
47
48
49
50
51
52
53
54
55
56
57
58
59
60
61
62
63
64
65
66
67
68
69
70
71
72
73
74
75
76
77
78
79
80
81
82
83
84
85
public class EditNotePageViewModel : ObservableObject, IEditorViewModel
{
public Func<Task<string>> OnSubmitting { get; set; }
public Action<string> OnInited { get; set; }
public Action OnFocus { get; set; }

public EditNotePageViewModel()
{
Submit = new Command(SubmitAction);

NoteSegmentState=NoteSegmentState.Edit;
var content = "";
using (Stream stream = Assembly.GetExecutingAssembly().GetManifestResourceStream("Editorjs.Assets.sample1.json"))
{
if (stream != null)
{
using (StreamReader reader = new StreamReader(stream))
{
content = reader.ReadToEnd();
}
}
}
Init(new Note()
{
Title = "sample",
Content=content

});
}

private void Init(Note note)
{
if (note != null)
{
Title = note.Title;
Content = note.Content;
}
OnInited?.Invoke(this.Content);
}


private string _title;

public string Title
{
get { return _title; }
set
{
_title = value;
OnPropertyChanged();
}
}


private string _content;

public string Content
{
get { return _content; }
set
{
_content = value;
OnPropertyChanged();
}
}


private async void SubmitAction(object obj)
{
var savedContent = await OnSubmitting?.Invoke();
if (string.IsNullOrEmpty(savedContent))
{
return;
}
this.Content=savedContent;

var note = new Note();
note.Title = this.Title;
note.Content = this.Content;
}
public Command Submit { get; set; }

}

注意这里的Init方法,用于初始化内容。这里我们读取Editorjs.Assets.sample1.json资源文件作为初始内容。

在这里插入图片描述

创建Blazor组件

创建Blazor页面EditorjsPage.razor

EditorjsPage.razor页面中,我们放置一个div,用于放置编辑器,

razor页面的 @Code 代码段中,放置EditNotePageViewModel属性,以及一个DotNetObjectReference对象,用于在JS中调用C#方法。

1
2
3
4
5
6
7
8
9
10
11
@code {
[Parameter]
public IEditorViewModel EditNotePageViewModel { get; set; }
private DotNetObjectReference<EditorjsPage> objRef;


protected override void OnInitialized()
{
objRef = DotNetObjectReference.Create(this);
}

初始化

在script代码段中,创建LoadContent函数,用于加载EditorJs的初始内容。

1
2
3
4
<div class="ce-main">
<div id="editorjs"></div>
</div>

LoadContent中,调用函数window.editor = new window.EditorJS(config)创建一个EditorJS对象,其中config对象包括holder,tools,data等属性,关于EditorJs配置的更多说明请参考官方文档

1
2
3
4
5
6
7
8
9
10
11
12
13
14
15
16
17
18
19
20
21
22
23
24
25
26
27
28
29
30
31
32
33
34
35
36
37
38
39
40
41
42
43
44
45
46
47
48
49
50
51
52
53
54
55
56
57
58
59
60
61
62
63
64
65
66
67
68
69
70
71
72
73
74
75
76
77
78
79
80
81
82
83
84
85
86
87
88
89
90
91
92
93
94
95
96
97
98
99
100
101
102
103
104
105
106
107
108
109
110
111
112
113
114
115
116
117
118
119
120
121
122
123
124
125
126
127
128
129
130
131
132
133
134
135
136
137
138
139
140
141
142
143
144
145
146
147
148
149
150
151
152
153
154
155
156
157
158
159
160
161
162
163
164
165
166
167
168
169
170
171
172
173
174
175
176
177
178
179
180
181
182
183
184
185
186
187
188
189
190
191
192
193
194
195
196
197
198
199
200
201
202
203
204
205
206
207
208
209
210
211
212
213
214
215
216
217
218
219
220
221
222
223
224
225
226
227
228
229
230
231
232
233
234
235
236
237
238
239
240
241
242
243
244
245
246
247
248
249
250
251
252
253
254
255
256
257
258
259
260
261
262
263
264
265
266
267
268
269
270
271
272
<script type="text/javascript">
window.editor = null;
window.viewService = {
LoadContent: function (content) {
var obj = JSON.parse(content);
var createEdtor = () => {
window.editor = new window.EditorJS({
holder: 'editorjs',

/**
* Tools list
*/
tools: {
paragraph: {
config: {
placeholder: "Enter something"
}
},

header: {
class: Header,
inlineToolbar: ['link'],
config: {
placeholder: 'Header'
},
shortcut: 'CMD+SHIFT+H'
},

/**
* Or pass class directly without any configuration
*/
image: {
class: ImageTool
},

list: {
class: NestedList,
inlineToolbar: true,
shortcut: 'CMD+SHIFT+L'
},

checklist: {
class: Checklist,
inlineToolbar: true,
},

quote: {
class: Quote,
inlineToolbar: true,
config: {
quotePlaceholder: '输入引用内容',
captionPlaceholder: '引用标题',
},
shortcut: 'CMD+SHIFT+O'
},


marker: {
class: Marker,
shortcut: 'CMD+SHIFT+M'
},

code: {
class: CodeTool,
shortcut: 'CMD+SHIFT+C'
},

delimiter: Delimiter,

inlineCode: {
class: InlineCode,
shortcut: 'CMD+SHIFT+C'
},

linkTool: LinkTool,

embed: Embed,

table: {
class: Table,
inlineToolbar: true,
shortcut: 'CMD+ALT+T'
},

},

i18n: {
messages: {
"ui": {
"blockTunes": {
"toggler": {
"Click to tune": "点击转换",
"or drag to move": "拖动调整"
},
},
"inlineToolbar": {
"converter": {
"Convert to": "转换成"
}
},
"toolbar": {
"toolbox": {
"Add": "添加",
"Filter": "过滤",
"Nothing found": "无内容"
},
"popover": {
"Filter": "过滤",
"Nothing found": "无内容"
}
}
},
"toolNames": {
"Text": "段落",
"Heading": "标题",
"List": "列表",
"Warning": "警告",
"Checklist": "清单",
"Quote": "引用",
"Code": "代码",
"Delimiter": "分割线",
"Raw HTML": "HTML片段",
"Table": "表格",
"Link": "链接",
"Marker": "突出显示",
"Bold": "加粗",
"Italic": "倾斜",
"InlineCode": "代码片段",
"Image": "图片"
},
"tools": {
"link": {
"Add a link": "添加链接"
},
"stub": {
'The block can not be displayed correctly.': '该模块不能放置在这里'
},
"image": {
"Caption": "图片说明",
"Select an Image": "选择图片",
"With border": "添加边框",
"Stretch image": "拉伸图像",
"With background": "添加背景",
},
"code": {
"Enter a code": "输入代码",
},
"linkTool": {
"Link": "请输入链接地址",
"Couldn't fetch the link data": "获取链接数据失败",
"Couldn't get this link data, try the other one": "该链接不能访问,请修改",
"Wrong response format from the server": "错误响应",
},
"header": {
"Header": "标题",
"Heading 1": "一级标题",
"Heading 2": "二级标题",
"Heading 3": "三级标题",
"Heading 4": "四级标题",
"Heading 5": "五级标题",
"Heading 6": "六级标题",
},
"paragraph": {
"Enter something": "请输入笔记内容",
},
"list": {
"Ordered": "有序列表",
"Unordered": "无序列表",
},
"table": {
"Heading": "标题",
"Add column to left": "在左侧插入列",
"Add column to right": "在右侧插入列",
"Delete column": "删除列",
"Add row above": "在上方插入行",
"Add row below": "在下方插入行",
"Delete row": "删除行",
"With headings": "有标题",
"Without headings": "无标题",
},
"quote": {
"Align Left": "左对齐",
"Align Center": "居中对齐",
}
},
"blockTunes": {
"delete": {
"Delete": "删除",
'Click to delete': "点击删除"
},
"moveUp": {
"Move up": "向上移"
},
"moveDown": {
"Move down": "向下移"
},
"filter": {
"Filter": "过滤"
}
},
}
},

/**
* Initial Editor data
*/
data: obj
});

}
if (window.editor) {
editor.isReady.then(() => {
editor.destroy();
createEdtor();
});
}
else {
createEdtor();
}

},
DumpContent: async function () {
outputData = null;
if (window.editor) {
if (window.editor.readOnly.isEnabled) {
await window.editor.readOnly.toggle();
}
var outputObj = await window.editor.save();
outputData = JSON.stringify(outputObj);
}
return outputData;
},
SwitchTheme: function () {
document.body.classList.toggle("dark-mode");
},

SwitchState: async function () {
state = null;
if (window.editor && window.editor.readOnly) {
var readOnlyState = await window.editor.readOnly.toggle();
state = readOnlyState;
}
return state;
},

Focus: async function (atEnd) {
if (window.editor) {
await window.editor.focus(atEnd);
}
},

GetState() {
if (window.editor && window.editor.readOnly) {
return window.editor.readOnly.isEnabled;
}
},


Destroy: function () {
if (window.editor) {
window.editor.destroy();
}
},

}

window.initObjRef = function (objRef) {
window.objRef = objRef;
}

</script>

在这里插入图片描述

保存

创建转存函数DumpContent

1
2
3
4
5
6
7
8
9
10
11
12
DumpContent: async function () {
outputData = null;
if (window.editor) {
if (window.editor.readOnly.isEnabled) {
await window.editor.readOnly.toggle();
}
var outputObj = await window.editor.save();
outputData = JSON.stringify(outputObj);
}
return outputData;
},

销毁

创建销毁函数Destroy

1
2
3
4
5
6

Destroy: function () {
if (window.editor) {
window.editor.destroy();
}
},

编写渲染逻辑

在OnAfterRenderAsync中调用初始化函数,并订阅OnSubmitting和OnInited事件,以便在提交事件触发时保存,以及文本状态变更时重新渲染。

1
2
3
4
5
6
7
8
9
10
11
12
13
14
15
16
17
protected override async Task OnAfterRenderAsync(bool firstRender)
{
if (!firstRender)
return;
if (EditNotePageViewModel != null)
{
EditNotePageViewModel.PropertyChanged += EditNotePageViewModel_PropertyChanged;
this.EditNotePageViewModel.OnSubmitting += OnSubmitting;
this.EditNotePageViewModel.OnInited += OnInited;
var currentContent = EditNotePageViewModel.Content;

await JSRuntime.InvokeVoidAsync("viewService.LoadContent", currentContent);
}

await JSRuntime.InvokeVoidAsync("window.initObjRef", this.objRef);

}
1
2
3
4
5
6
7
8
9
10
11
12
private async Task<string> OnSubmitting()
{
var savedContent = await JSRuntime.InvokeAsync<string>("viewService.DumpContent");
return savedContent;
}


private async void OnInited(string content)
{
await JSRuntime.InvokeVoidAsync("viewService.LoadContent", content);
}

在这里插入图片描述

实现只读/编辑功能

在.NET本机中,我们使用枚举来表示编辑状态。 并在控件上设置一个按钮来切换编辑状态。

1
2
3
4
5
public enum NoteSegmentState
{
Edit,
PreView
}

EditNotePageViewModel.cs:

1
2
3
4
5
6
7
8
9
10
11
12
13
14
...
private NoteSegmentState _noteSegmentState;

public NoteSegmentState NoteSegmentState
{
get { return _noteSegmentState; }
set
{
_noteSegmentState = value;
OnPropertyChanged();

}
}

EditNotePage.xaml:

1
2
3
4
5
6
7
8
9
10
11
12
13
14
15
...
<StackLayout RadioButtonGroup.GroupName="State"
RadioButtonGroup.SelectedValue="{Binding NoteSegmentState,Mode=TwoWay}"
Orientation="Horizontal">
<RadioButton Value="{x:Static service:NoteSegmentState.Edit}"
Content="编辑">

</RadioButton>
<RadioButton Value="{x:Static service:NoteSegmentState.PreView}"
Content="预览">

</RadioButton>


</StackLayout>

Editorjs官方提供了readOnly对象,通过toggle()方法,可以切换编辑模式和只读模式。

在创建Editorjs实例时,也可以通过设置readOnly属性为true即可实现只读模式。

切换模式

在razor页面中创建SwitchState函数,用来切换编辑模式和只读模式。

1
2
3
4
5
6
7
8
9
SwitchState: async function () {
state = null;
if (window.editor && window.editor.readOnly) {
var readOnlyState = await window.editor.readOnly.toggle();
state = readOnlyState;
}
return state;
},

获取只读模式状态

在razor页面中创建GetState函数,用来获取编辑模式和只读模式的状态。

1
2
3
4
5
6
7
8

GetState() {
if (window.editor && window.editor.readOnly) {
return window.editor.readOnly.isEnabled;
}
},


响应切换事件

我们监听EditNotePageViewModel 的NoteSegmentState属性变更事件,当状态改变时,调用对应的js方法

1
2
3
4
5
6
7
8
9
10
11
12
13
14
15
16
17
18
19
20
21
22
23
24
25
private async void EditNotePageViewModel_PropertyChanged(object sender, System.ComponentModel.PropertyChangedEventArgs e)
{
if (e.PropertyName == nameof(EditNotePageViewModel.NoteSegmentState))
{
if (EditNotePageViewModel.NoteSegmentState==NoteSegmentState.PreView)
{
var state = await JSRuntime.InvokeAsync<bool>("viewService.GetState");
if (!state)
{
await JSRuntime.InvokeAsync<bool>("viewService.SwitchState");

}

}
else if (EditNotePageViewModel.NoteSegmentState==NoteSegmentState.Edit)
{
var state = await JSRuntime.InvokeAsync<bool>("viewService.GetState");
if (state)
{
await JSRuntime.InvokeAsync<bool>("viewService.SwitchState");
}
}
}
}

在这里插入图片描述

实现明/暗主题切换

lib/editorjs/css/main.css中,定义了.dark-mode类的样式表

1
2
3
4
5
6
7
8
9
10
11
12
13
14
15
16
17
18
19
20
21
22
23
24
25
26
27
28
29
30
31
32
33
34
35
36
37
38
39
40
.dark-mode {
--color-border-light: rgba(255, 255, 255,.08);
--color-bg-main: #212121;
--color-text-main: #F5F5F5;
}

.dark-mode .ce-popover {
--color-background: #424242;
--color-text-primary: #F5F5F5;
--color-text-secondary: #707684;
--color-border: #424242;
}

.dark-mode .ce-toolbar__settings-btn {
background: #2A2A2A;
border: 1px solid #424242;
}

.dark-mode .ce-toolbar__plus {
background: #2A2A2A;
border: 1px solid #424242;
}

.dark-mode .ce-popover-item__icon {
background: #2A2A2A;
}

.dark-mode .ce-code__textarea {
color: #212121;
background: #2A2A2A;
}

.dark-mode .tc-popover {
--color-border: #424242;
--color-background: #424242;
}
.dark-mode .tc-wrap {
--color-background: #424242;
}

在razor页面中添加SwitchTheme函数,用于用于切换dark-mode“的`类名,从而实现暗黑模式和正常模式之间的切换。

1
2
3
SwitchTheme: function () {
document.body.classList.toggle("dark-mode");
},

OnInitializedAsync中,订阅Application.Current.RequestedThemeChanged事件,用于监听主题切换事件,并调用SwitchTheme函数。

1
2
3
4
5
6
7
8
9
10
11
protected override async Task OnInitializedAsync()
{
objRef = DotNetObjectReference.Create(this);

Application.Current.RequestedThemeChanged += OnRequestedThemeChanged;

}
private async void OnRequestedThemeChanged(object sender, AppThemeChangedEventArgs args)
{
await JSRuntime.InvokeVoidAsync("viewService.SwitchTheme");
}

在渲染页面时,也判断是否需要切换主题

1
2
3
4
5
6
7
8
9
10
11
12
13
protected override async Task OnAfterRenderAsync(bool firstRender)
{
if (!firstRender)
return;
···
if (Application.Current.UserAppTheme==AppTheme.Dark)
{
await JSRuntime.InvokeVoidAsync("viewService.SwitchTheme");

}

}

在这里插入图片描述

项目地址

Github:maui-samples

[MAUI]集成富文本编辑器Editor.js至.NET MAUI Blazor项目

https://blog.matoapp.net/posts/33414209/

作者

林晓lx

发布于

2024-04-13

更新于

2024-09-11

许可协议

评论