前端代码的框架采用vue.js + elementUI 这套较为简单的方式实现,以及typescript语法更方便阅读。
首先来编写发送验证码函数, 登录,绑定,解绑的业务都需要发送验证码功能,通过currentVerifyingType 来区别当前验证码种类。也就是在服务端的Purpose目的。
VerifyingType 可以为LOGIN,UNBIND_PHONENUMBER或BIND_PHONENUMBER
1
2
3
4
5
6
7
8
9
10
11
12
13
14
15
16
17
18
19
20
21
22
23
| async sendVerificationCode(phoneNumber, type) {
this.currentVerifyingType = type;
this.smsSendCd = 60;
this.timer = setInterval(() => {
this.smsSendCd--;
if (this.smsSendCd <= 0) {
clearInterval(this.timer);
}
}, 1000);
await request(`${this.host}${this.prefix}/Captcha/Send`, "post", {
userId: this.userInfo == null ? null : this.userInfo.id,
phoneNumber: phoneNumber,
type: type,
})
.catch((re) => {
var res = re.response.data;
this.errorMessage(res.error.message);
})
.then((re) => {
var res = re.data.result;
this.successMessage("发送验证码成功");
});
}
|
注意几个关键的全局变量
1
2
3
4
5
6
7
8
9
10
| userInfo: null, //用户对象
currentVerifyingType: null, //当前发送验证码的用途
smsSendCd: 0, //发送验证码的冷却时间,默认60s
loginForm: { //登录对象
username: "",
password: "",
},
token: null, //登录凭证Token
verifyNumber: null, //填写的验证码
|
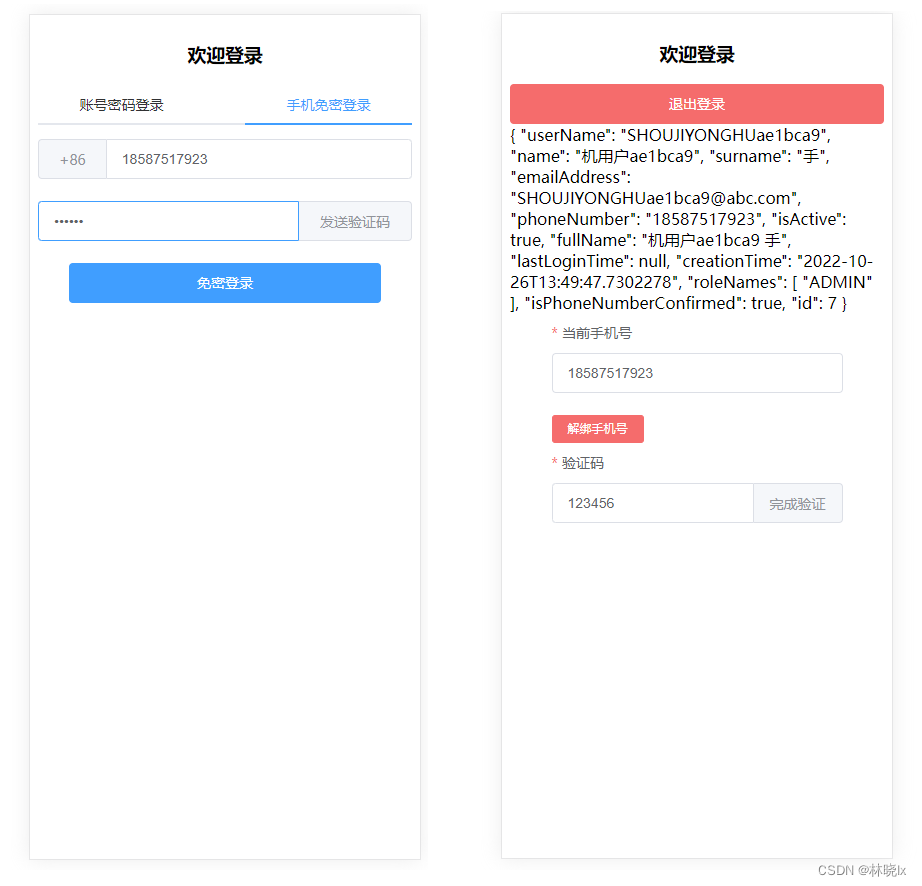
登录功能
创建手机号输入控件
1
2
3
4
5
6
7
8
9
| <el-input
ref="username"
v-model="loginForm.username"
:placeholder="'请输入手机号'"
type="text"
tabindex="1"
autocomplete="on">
<template slot="prepend">+86</template>
</el-input>
|
创建验证码控件,并添加一个按钮用于发送验证码,点击后触发sendVerificationCode
1
2
3
4
5
6
7
8
9
10
11
12
13
14
15
16
17
18
19
20
| <el-input
ref="password"
v-model="loginForm.password"
:type="passwordType"
:placeholder="'发送验证码后键入验证码'"
tabindex="2"
autocomplete="on"
@blur="capsTooltip = false"
@keyup.enter.native="handleLogin"
>
<el-button
slot="append"
:disabled="smsSendCd > 0"
@click="sendVerificationCode(loginForm.username, 'LOGIN')"
>{{
smsSendCd == 0 ? "发送验证码" : smsSendCd + "后重试"
}}
</el-button>
</el-input>
|

登录函数,将验证电话号码(即用户名)和验证码
1
2
3
4
5
6
7
8
9
10
| async handleLogin() {
this.loading = true;
let phoneNumber = this.loginForm.username;
let password = this.loginForm.password;
phoneNumber = phoneNumber.trim();
await request(`${this.host}api/TokenAuth/Authenticate`, "post", {
phoneNumber,
password,
});
}
|
登录完成后,将Token存入Cookie
1
2
3
| .then(async (res) => {
var data = res.data.result;
setToken(data.accessToken);
|
绑定/解绑功能
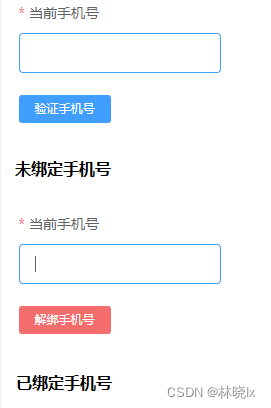
创建新手机号输入框,若没有绑定手机,附带绑定按钮,按下后将发送验证码;若已绑定手机,需要先解绑,才能绑定新号码,附带解绑按钮,按下后将发送验证码
1
2
3
4
5
6
7
8
9
10
11
12
13
14
15
16
17
18
19
20
21
22
| <el-input v-model="userInfo.phoneNumber"> </el-input>
<el-button
v-if="!userInfo.isPhoneNumberConfirmed"
size="mini"
type="primary"
:disabled="smsSendCd > 0"
@click="
sendVerificationCode(userInfo.phoneNumber, 'BIND_PHONENUMBER')
"
>{{ smsSendCd == 0 ? "验证手机号" : smsSendCd + "后重试" }}
</el-button>
<el-button
v-else
size="mini"
type="danger"
:disabled="smsSendCd > 0"
@click="
sendVerificationCode(userInfo.phoneNumber, 'UNBIND_PHONENUMBER')
"
>{{ smsSendCd == 0 ? "解绑手机号" : smsSendCd + "后重试" }}
</el-button>
|
创建校验短信验证码控件
1
2
3
4
5
6
7
8
9
10
|
<el-input v-model="verifyNumber">
    <el-button
        slot="append"
        type="primary"
        size="mini"
        @click="verify">
        完成验证
    </el-button>
</el-input>
|

创建校验短信验证码函数,
1
2
3
4
5
6
7
8
9
10
11
12
13
14
15
16
17
18
19
20
21
22
23
24
| async verify() {
var action = null;
if (this.currentVerifyingType == "BIND_PHONENUMBER") {
action = "Bind";
} else if (this.currentVerifyingType == "UNBIND_PHONENUMBER") {
action = "Unbind";
} else {
action = "Verify";
}
await request(`${this.host}${this.prefix}/Captcha/${action}`, "post", {
token: this.verifyNumber,
})
.catch((re) => {
var res = re.response.data;
this.errorMessage(res.error.message);
})
.then((re) => {
var res = re.data;
if (res.success) {
this.successMessage("绑定成功");
window.location.reload()
}
});
}
|
获取用户信息功能
登录成功后我们要拿到当前用户的信息,存入userInfo对象,并在页面上简单展示
1
| <span>{{ userInfo }}</span>
|
创建一个获取当前用户的函数
1
2
3
4
5
6
7
8
9
10
11
12
13
14
15
16
17
18
19
20
21
22
| async getCurrentUser() {
await request(
`${this.host}${this.prefix}/User/GetCurrentUser`,
"get",
null
)
.catch((re) => {
var res = re.response.data;
this.errorMessage(res.error.message);
})
.then(async (re) => {
var result = re.data.result as any;
this.userInfo = result;
this.token = getToken();
clearInterval(this.timer);
this.smsSendCd = 0;
this.currentVerifyingType = null;
this.successMessage("登录成功");
});
}
|
此函数将在成功登录之后调用,也用于已登录状态的情况下,打开网页时调用,在handleLogin函数中,在请求登录api后编写续操作
1
2
3
4
5
| .then(async (res) => {
var data = res.data.result;
setToken(data.accessToken);
await this.getCurrentUser();
})
|
退出登录
登出, 将Token以及用户信息置空
1
2
3
4
5
6
7
| <el-button
:loading="loading"
type="danger"
style="width: 100%"
@click.native.prevent="logout">
退出登录
</el-button>
|
1
2
3
4
5
| logout() {
setToken(null);
this.token = null;
this.userInfo = null;
},
|
至此,已完成了所有的工作
最终效果
项目地址
Github:matoapp-samples